


🏆1st place on category “Crafter” at “Shelly smart home challenge 2025” 🏆
Hey everyone,
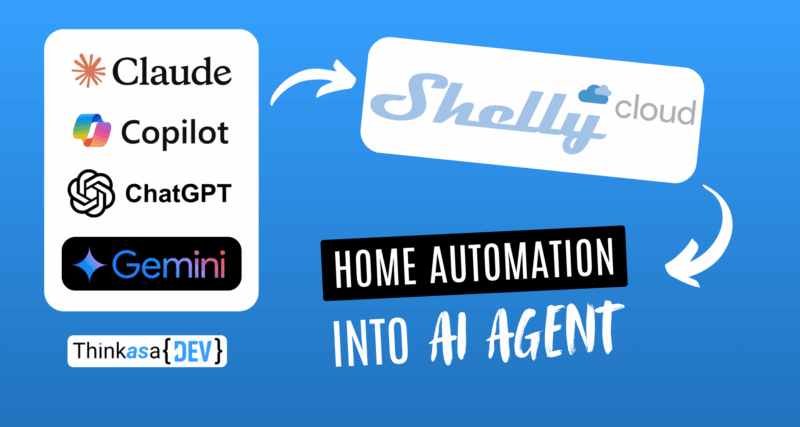
Today I’m excited to share a fascinating project that bridges the worlds of AI and home automation. A few weeks ago, I started exploring MCP servers (which I covered in a previous article), with the goal of integrating a .NET 9 application with Claude AI, my go-to assistant for quite some time now.
In that earlier piece, I laid out the fundamentals of creating a local MCP server, hypothetically building tools to read various data from my home automation setup. This time, I’ve taken it a step further by creating a local MCP server that can actually control Shelly devices through the Shelly Cloud API. Here’s what I achieved:
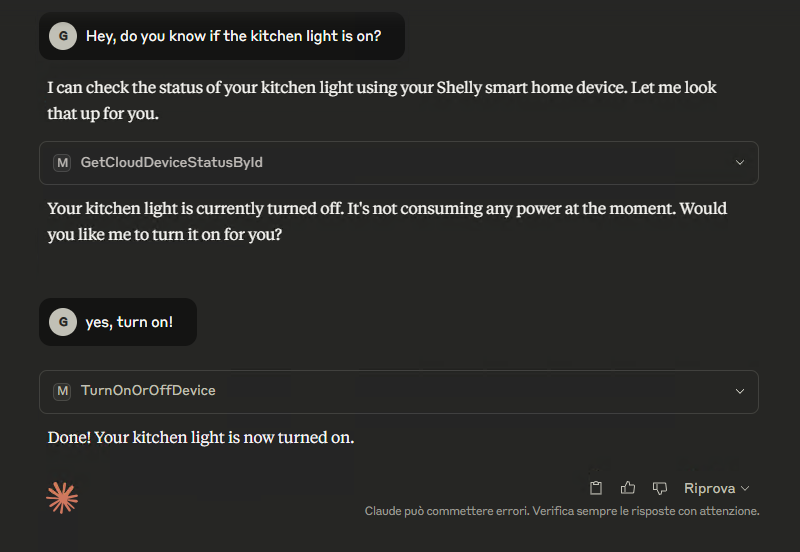

Pretty incredible, right? Now Claude can tell me if I’ve left lights on, turn them off, or provide information about power consumption and temperature readings.
Let’s walk through this step by step and see what we need to make it all work.
Objective
Integrate home automation with Claude (or Copilot/ChatGPT/Gemini…).
Rather than diving into excessive implementation details, I want to focus on project organization and architectural design. The complete project is available on my GitLab repository—feel free to download, test, and extend it.
What we need
Some time ago, I wrote two articles on this blog explaining how I made three fans smart to combat dangerous radon gas at home, and how I automated a washing machine to know when the wash cycle finished. In both cases, I used Shelly devices, which I’ve been using for years. They’re reliable, secure, and compact—perfect for fitting into electrical outlets with limited space.
I have no commercial affiliation with Shelly; I’m simply sharing my positive experience with their products.
Architecture overview
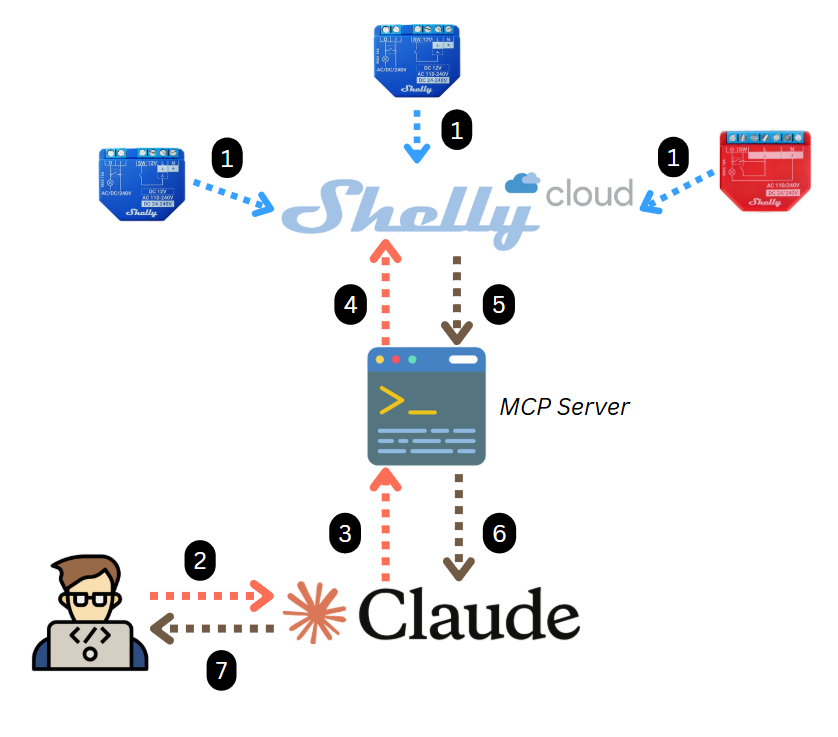
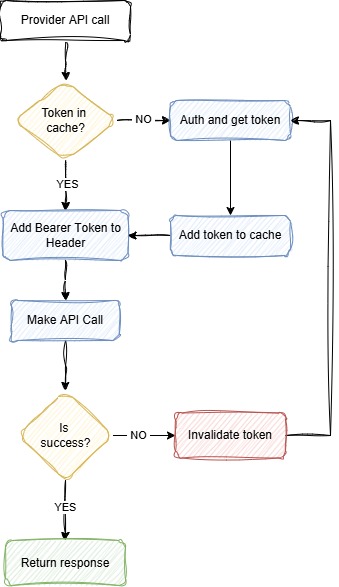
Before we begin, let’s understand the complete workflow:
- Shelly devices (with cloud enabled) send their “status” to Shelly Cloud
- Our application (MCP Server) extends our AI assistant’s capabilities (Claude in my case, but it could be Gemini, ChatGPT, Copilot, etc.). When we ask questions, the AI determines whether to use these tools or respond normally.
We can visualize the workflow like this:
The .NET Project
At the time of writing, I’ve only implemented calls to the Cloud portion of Shelly’s API—the local network API integration is still pending. While the Cloud APIs are less comprehensive and documented, they allow model integration even when you’re outside your local network.
WARNING This project uses Cloud API V2, which is currently in Beta and may change over time.
Project structure
I’ve organized the solution into the following projects:
- Shelly.MCPServer
- Contains the actual tools exposed to our AI model.
- Shelly.Models
- Houses the classes used throughout the project.
- Shelly.Services
- Contains services and their interfaces. This is where API calls are made and where services are injected into the main project via dependency injection. As the project grows, I may consider splitting this into separate Services and Infrastructure projects using clean architecture principles.
Let’s examine the key components of each project.
Shelly.McpServer
using Asg.MCP.Services;
using Microsoft.Extensions.Configuration;
using Microsoft.Extensions.DependencyInjection;
using Microsoft.Extensions.Hosting;
using Microsoft.Extensions.Logging;
using Shelly.Models.Cloud;
using Shelly.Services.Services;

var builder = Host.CreateApplicationBuilder(args);

#region init appsettings

//Initialize arguments
builder.Configuration
    .AddCommandLine(args);

//get "--settingPath"
var settingsPath = builder.Configuration["settingsPath"];

if (!string.IsNullOrEmpty(settingsPath) && File.Exists(settingsPath))
{
    builder.Configuration
        .AddJsonFile(settingsPath, optional: false, reloadOnChange: true)
        .AddUserSecrets<Program>(); ;
}

else {
    builder.Configuration
        .SetBasePath(Directory.GetCurrentDirectory())
        .AddJsonFile("appsettings.json", optional: false, reloadOnChange: true)
        .AddUserSecrets<Program>(); ;
}

#endregion

//Init log on console
builder.Logging.AddConsole(consoleLogOptions => {
    // Configure all logs to go to stderr
    consoleLogOptions.LogToStandardErrorThreshold = LogLevel.Trace;
});


#region Dependency Injection

//DI of my services
builder.Services.AddHttpClient<ShellyCloudService>("PhoneProviderClient");
builder.Services.AddSingleton<ShellyCloudDeviceStore>();
builder.Services.AddSingleton<IShellyCloudService, ShellyCloudService>();

//MCP dependency injection
builder.Services
    .AddMcpServer()
    .WithStdioServerTransport()
    .WithToolsFromAssembly();

#endregion

var app = builder.Build();
await app.RunAsync();The first section enables command line arguments, allowing us to receive the appsettings.json path as a startup parameter. This is useful because we’ll deploy the compiled application to a different location than our .NET project.
The second section configures dependency injection for our services, which we’ll explore in detail later.
Shelly.Models
Since this is purely a DTO project, there’s no particular logic to explain. The “Cloud” folder contains classes for mapping payloads and responses from the Cloud. If I implement direct device APIs in the future, I’ll organize them in a separate directory.
The GenericDeviceStatusModel class is a generic class containing only the information we need, designed to work with device APIs as well.
Shelly.Services
This is where we have more to discuss. Let’s proceed systematically.
Interfaces
This directory contains service interfaces used in the Shelly.McpServer project for dependency injection initialization.
Mapper
Contains a class for mapping information from API response objects to the generic GenericDeviceStatusModel object. Some information (like whether a device is on or off) is available in different locations depending on the device type (relays, switches, etc.).
Services
ShellyCloudService.cs contains the methods and API calls to Shelly Cloud. Note that there’s currently a limit of 1 request per second. For error handling, I’ve used the Polly library (policies are saved in the Utils directory), which provides standardized and structured handling of call failures (with a 1-second delay between attempts).
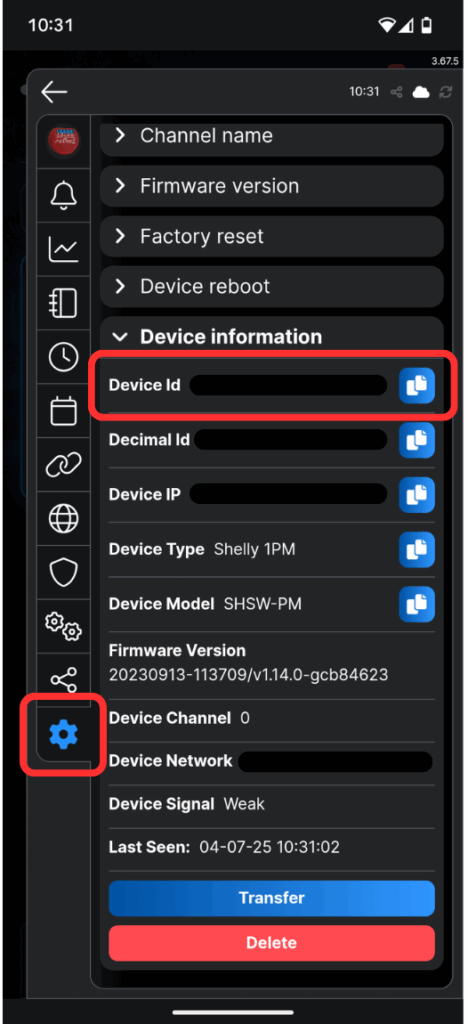
Unfortunately, there’s currently no API to retrieve a list of all devices associated with your account, so you must manually register them in the ShellyCloudDeviceStore.cs class. Device IDs can be obtained from the Shelly app in the individual device information.
In this same class, I’ve added an array of “friendly names” where we register all possible names we use to ask our AI assistant about device status.
The “Channel” field differentiates switches for devices that support multiple channels, like the Shelly Plus 2PM. These devices might control two light points, for example, each with the same ID but different Channel IDs.
using Shelly.Models.Cloud;

namespace Shelly.Services.Services
{
    public class ShellyCloudDeviceStore
    {
        public readonly IEnumerable<DeviceNameMappingStoreItem> Store =
            new List<DeviceNameMappingStoreItem>()
            {
                new DeviceNameMappingStoreItem()
                {
                    DeviceId = "xxxxxxxxx",
                    ChannelId = 0,
                    FriendlyNames = ["kitchen", "kitchen light", "luce cucina", "cucina"],
                    DeviceType = "switch"
                },

                new DeviceNameMappingStoreItem()
                {
                    DeviceId = "cccccccccc",
                    ChannelId = 0,
                    FriendlyNames = ["garage", "basculante", "porta garage", "garage door"],
                    DeviceType = "sensor"
                },
            };
    }
}API Key Management
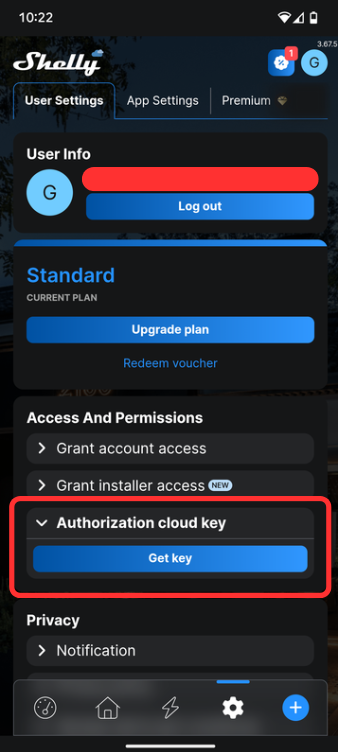
To connect to Shelly Cloud, we need a cloud address and an API key. The first can be retrieved from our account settings.
At the project level, we’ll handle these two aspects in different ways: the API endpoint goes in our appsettings.json:
{
  "SHELLY_API_ENDPOINT": "shelly-12-eu.shelly.cloud"
}For the API key (sensitive information), we’ll use Visual Studio secrets:
{

  "SHELLY_API_KEY": "XXXXXXXXXXXXXXXXXXXXXXX"

}WARNING In debug mode, secrets are automatically added to our appsettings.json, but not in production. Your API key must be kept secure and secret. Decide how to handle this information: you can add it to appsettings.json, add it as an environment variable, or use a more professional service like Azure Key Vault. Since this project is on my PC in my user directory with encryption enabled, I considered it “safe” to add it to appsettings.json.
MCP server deployment
Unlike what we saw in the previous MCP server article, we won’t point Claude directly to the project but will publish it to a dedicated directory on our PC. This helps during development because if we pointed directly to the project, we’d have to close Claude every time we need to recompile (since an instance gets launched).
Choose a directory where you can add all your MCP servers. I placed mine at C:\Users\<username>\MCP\ShellyMcpServer\Shelly.McpServer.exe.
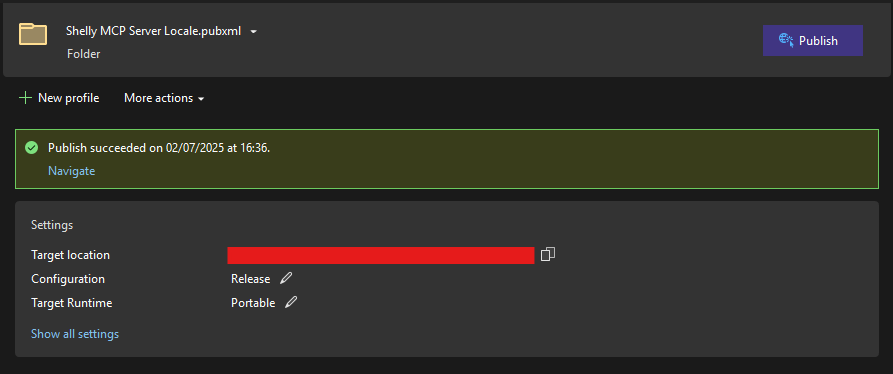
Once you’ve created the directory, navigate to your .NET project and publish it in Release configuration.
Connecting the MCP Server to Claude
Now that the files are published, we need to instruct Claude on how to launch our application, passing the appsettings as a parameter with configuration settings. Open Claude, go to settings, and open the plugin configuration file. Modify it as follows:
{
    "mcpServers": {
        "mcp-shelly": {
            "command": "C:\\Users\\<user>\\MCP\\ShellyMcpServer\\Shelly.McpServer.exe",
            "args": [
                "--settingsPath",
                "C:\\Users\\<user>\\MCP\\ShellyMcpServer\\appsettings.json"
            ]
        }
    }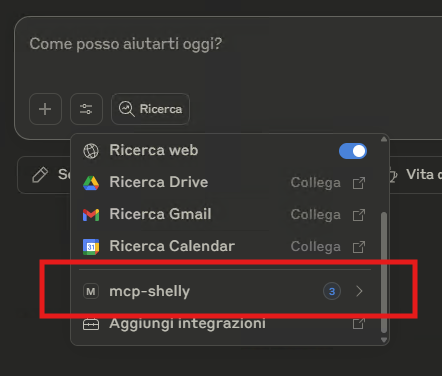
}Close Claude (from the system tray) and restart it. You should now see your MCP server connected:
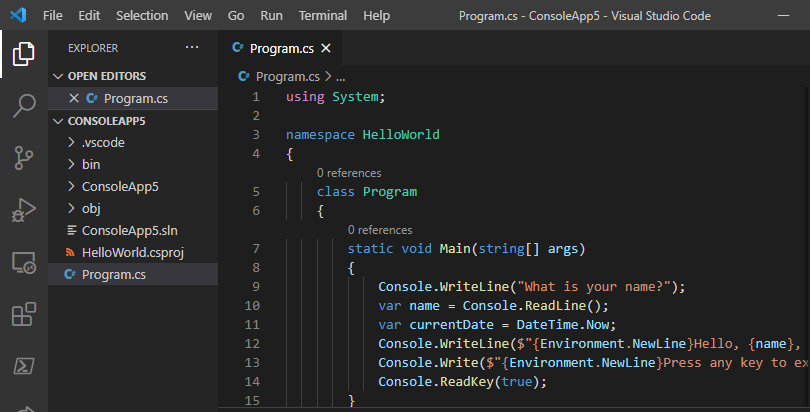
Testing the application
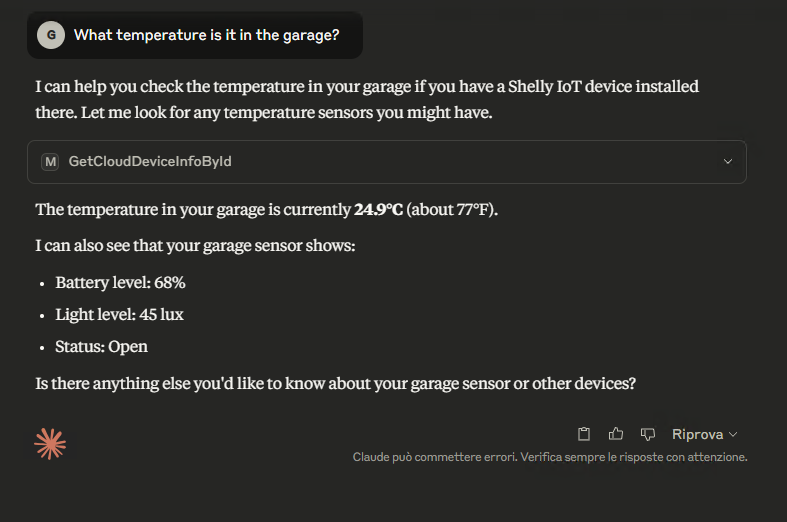
Let’s run some tests by asking Claude to interact with our Shelly devices:
Conclusions
Today’s project is a natural continuation of my first article and demonstrates how to integrate the Shelly ecosystem into our personal AI assistant. This project, available to everyone on GitLab, is the first step toward building an MCP server that communicates with our home automation—a very personal context.
Someday, each of us will have our own custom-built assistant. MCP servers are the first step toward this future because they allow us to “extend” and “personalize” a “general” AI model with contexts related to our lives. This means we’ll be able to ask our AI assistant to manage our home, adjust temperature, check what’s in the fridge, see if it’s raining at home—all handled through these integration applications. Better integrations mean better efficiency and productivity.
I already have other projects in mind that see this project as one of the fundamental building blocks for their success. I’ll work on developing them and return with new stories to tell and new experiences to share with all of you.
Until next time!
