


If this is your first time landing on my site, welcome! If you’re a returning visitor, welcome back! 🙂
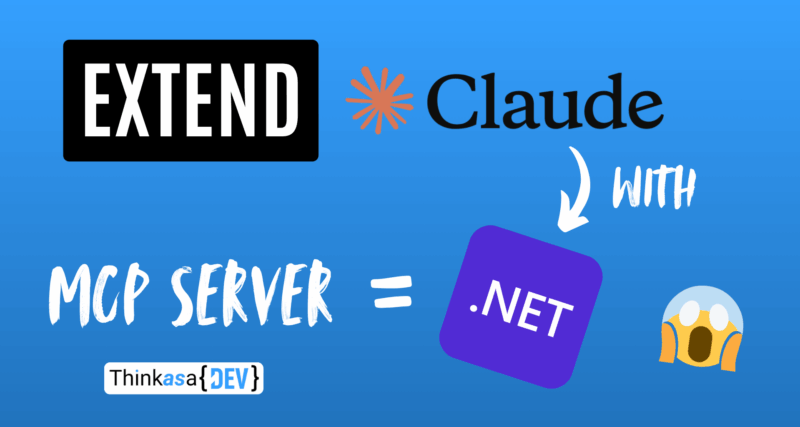
Today I want to share a little project I recently completed: adding “custom” functionality to Claude (the LLM I use daily)… how? By building a small MCP server with .NET 9!
Objective
Through a VPN, I have access to my home’s Home Assistant setup, and I often find myself opening the phone app to check various parameters—like my aquarium temperature or the outdoor temperature. Since I work all day with Claude Desktop open, I wondered: why not enable my LLM to fetch this information and expose certain functionalities? This integration project was born from that idea.
In an enterprise context, this could translate into integrating custom environment functionalities directly through our AI assistant, whether that’s Claude, Gemini, ChatGPT, Copilot, or others.
Claude, can you deploy the software for client X?
Gemini, what are the top 5 most recurring errors in client Z's production software?
Copilot, can you tell me how many active users are currently on my application Z?
ChatGPT, can you create a ticket for the infrastructure team saying my PC isn't working anymore?
What is an MCP server?
An MCP (Model Context Protocol) server is software that implements the MCP protocol (designed and developed by Anthropic), whose goal is to define a “standard” for building applications that integrate with AI models.
Currently, the protocol defines three main elements:
- Resources: data or content that the model can read (files, databases, etc.)
- Tools: functions that the model can execute (we’ll see this in this article)
- Prompts: predefined prompt templates that the model can use
This protocol is still relatively new, but it’s the first step in defining a common integration standard for all AI models.
The official MCP protocol documentation is available here
Project architecture
I built this project by creating an MCP server in .NET 9, leveraging a library currently in preview.
As mentioned earlier, Anthropic defined the MCP protocol some time ago to enable building these types of applications, which I believe are part of the future of LLMs since they allow you to add contextual information that’s often private.
Applied to an enterprise environment, I could securely integrate documentation or functionalities from my tools (time tracking, accounting software, development services, etc.).
Architecturally, we’ll add an integration to Claude with our MCP server, and it will handle routing to our MCP server or providing standard responses.

Creating an MCP server
Creating the .NET project
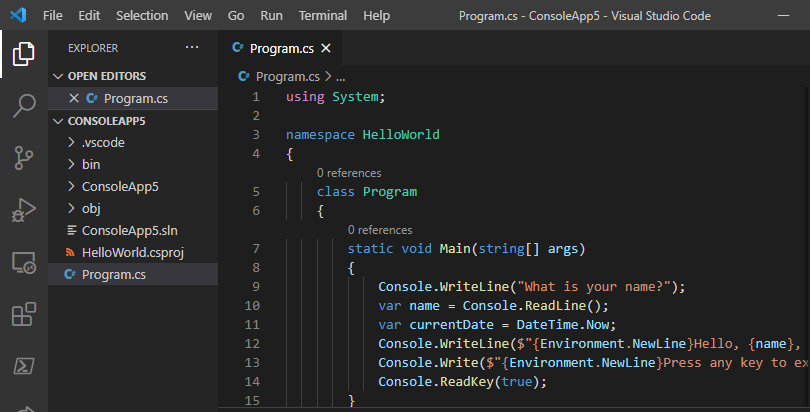
First, let’s create a new console application.
Once that’s done, add these two NuGet packages:
dotnet add package ModelContextProtocol --prerelease
dotnet add package Microsoft.Extensions.HostingNext, we’ll modify the Program.cs file. Delete all existing content and complete it as follows:
using Microsoft.Extensions.DependencyInjection;
using Microsoft.Extensions.Hosting;
using Microsoft.Extensions.Logging;

var builder = Host.CreateApplicationBuilder(args);
builder.Logging.AddConsole(consoleLogOptions =>
{
    // Configure all logs to go to stderr
    consoleLogOptions.LogToStandardErrorThreshold = LogLevel.Trace;
});

builder.Services
    .AddMcpServer()
    .WithStdioServerTransport()
    .WithToolsFromAssembly();

await builder.Build().RunAsync();Lines 5-10 initialize the application, configuring the log level to Trace.
.AddMcpServer() is a method from the preview library (ModelContextProtocol) that starts the MCP server when we launch the application, along with all its dependencies.
.WithStdioServerTransport() defines the “standard input/output” communication method between the server (MCP) and client (AI). Claude will interact with our application via command line—this communication strategy is most suitable for this context.
.WithToolsFromAssembly() scans the assembly and adds all available “tools” for our model. Classes/methods to expose to the model will be appropriately marked with decorators.
Creating an MCP Tool
Let’s create a new class in our project called “IotMcpTools“—here we’ll define all methods and functionalities exposed to our AI agent. You can place it wherever you prefer in your project since it will be dynamically discovered at startup.
using ModelContextProtocol.Server;
using System;
using System.Collections.Generic;
using System.ComponentModel;
using System.Linq;
using System.Text;
using System.Threading.Tasks;

namespace ThinkAsADev.MCP.McpTools
{
    [McpServerToolType]
    public static class IotMcpTool
    {
        [McpServerTool, Description("Get temperature of specific room")]
        public static string GetTemperature(string roomName)
        {
            int temperature = new Random().Next(18, 25);

            //Integrations with HomeAssistant or others tools

            return $"{temperature}°C";
        }
    }
}As mentioned before, the class has the [McpServerToolType] decorator while the method has the[McpServerTool, ...] decorator, including a description of the method’s function. This description is crucial because it will be read and understood by our LLM!
Finally, let’s verify that the application starts correctly. You can press play in your IDE or run the dotnet run command.
Claude Desktop integration
We now need to instruct Claude Desktop that there’s a new local MCP server available, and we’ll do this by modifying an application configuration file specifically designed for this purpose.
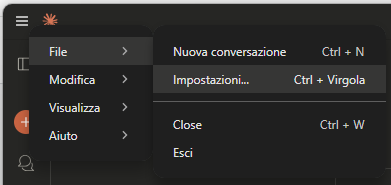
Open Claude and go to File –> Settings
A window will open—select “Developers” and click the “Edit Config” button.
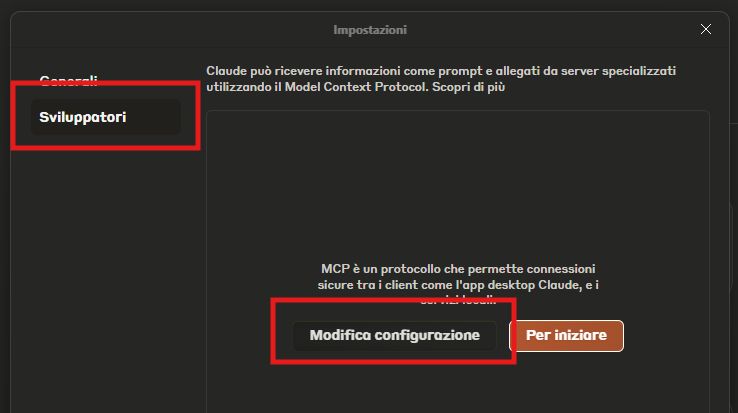
The file explorer will open, where you’ll find a file called “claude_desktop_config.json“

Open it and add this JSON (the first time, the file should be empty with just two curly braces):
{
    "mcpServers": {
        "ThinkAsADev.com": {
            "command": "dotnet",
            "args": [
                "run",
                "--project",
                "C:\\Sorgenti\\ThinkAsADev.MCP\\ThinkAsADev.MCP",
                "--no-build"
            ]
        }
    }
}
be careful Replace "C:\Source\ThinkAsADev.MCP\ThinkAsADev.MCP" with your application’s path!
“ThinkAsADev.com” is the name I gave my MCP server—you can change it to whatever you prefer to identify it in Claude’s UI.
Save the file and close Claude (Important: it must be closed from the bottom left!)
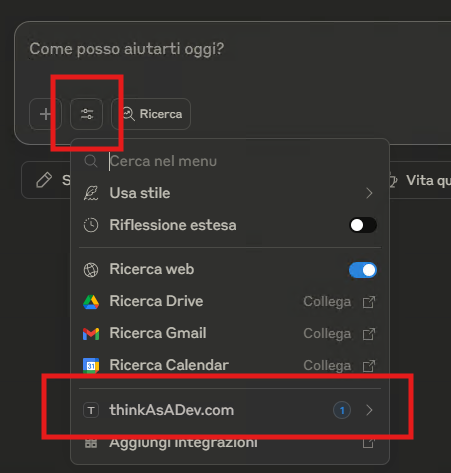
Reopen Claude. If we’ve done everything correctly, we’ll have a new tool available by clicking the settings icon.
Once Claude starts, it will run your application in the background. This means if you make changes to the source code, you won’t be able to recompile (because Claude locks the files). To do so, you’ll need to close Claude again. A good alternative is to create a directory on your PC where you copy your project’s build files, so Claude doesn’t use the same ones as your project.
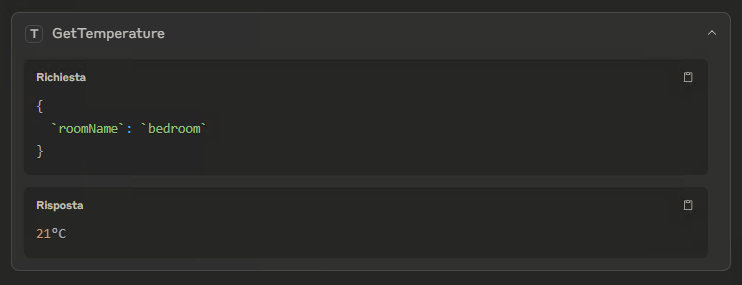
Will It Work? Let’s Test It!
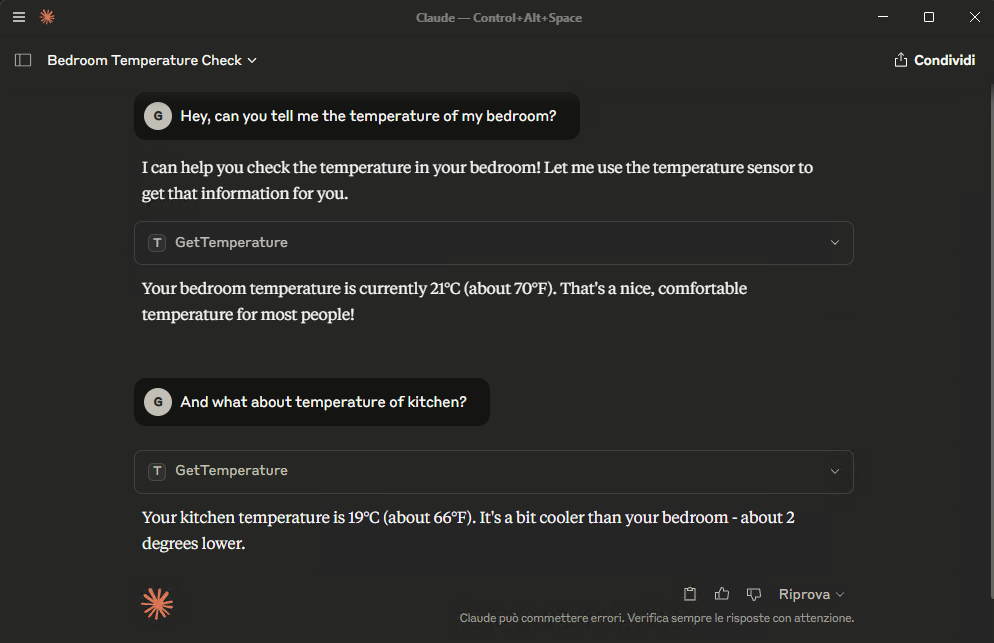
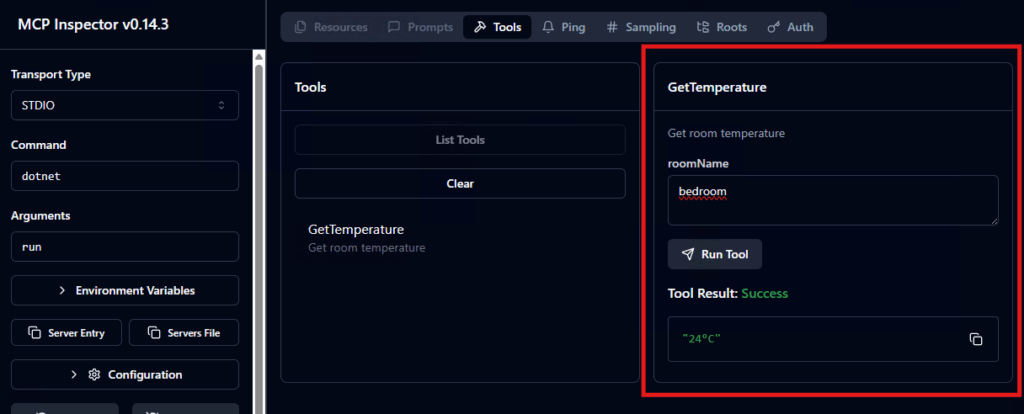
As you can see, the GetTemperature method from our application was called. You can also see the payload it created and the JSON response returned by the service.
How long did it take us to create an MCP server and integrate it? Just a few minutes! This is exactly what surprised me the first time I tackled this project.
The more “complex” part comes afterward, obviously, when you need to integrate services within our application.
Testing and debugging
So far we’ve seen how to create a simple tool and integrate it with Claude, but how do we test it or debug? Let’s explore together.
Before we start
As I mentioned earlier, Claude locks our project files since it runs them in the background. The best solution to this problem is to copy our application’s compiled output to a dedicated directory (e.g., C:\MCPServer\ThinkAsADev), then update the claude_desktop_config.json file to point to the new path.
Alternatively, we’ll need to temporarily stop Claude or remove our application from the claude_desktop_config.json file.
Environment setup
Testing and debugging is performed through a Node.js package that “simulates” being an LLM and provides a GUI for testing methods.
First, install Node.js, then open a terminal and install the package we need:
npm install @modelcontextprotocol/inspectorNow navigate to our project directory via terminal:
cd C:\Sorgenti\ThinkAsADev.MCP\ThinkAsADev.MCPand launch our MCP server through the package we just installed:
npx @modelcontextprotocol/inspector dotnet runThe output will be:
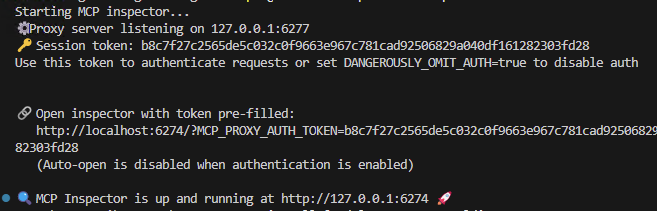
Notice that at the bottom, an IP address with a port appears. If we open it in our browser, a webapp generated by the installed package will open.
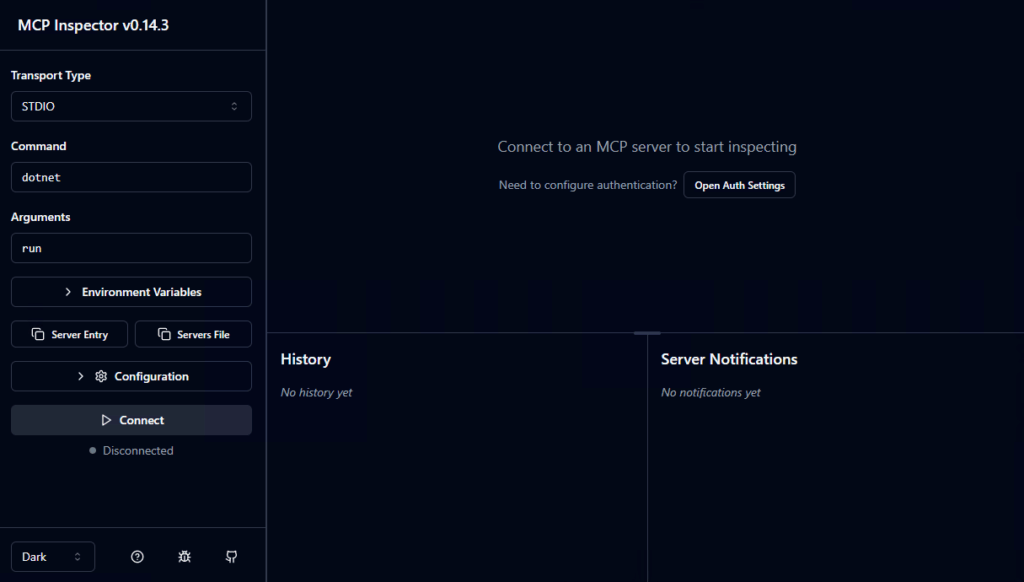
The first time, copy the link with the token in the querystring MCP_PROXY_AUTH_TOKEN into the browser to initialize authentication. Now click the “Connect” button.
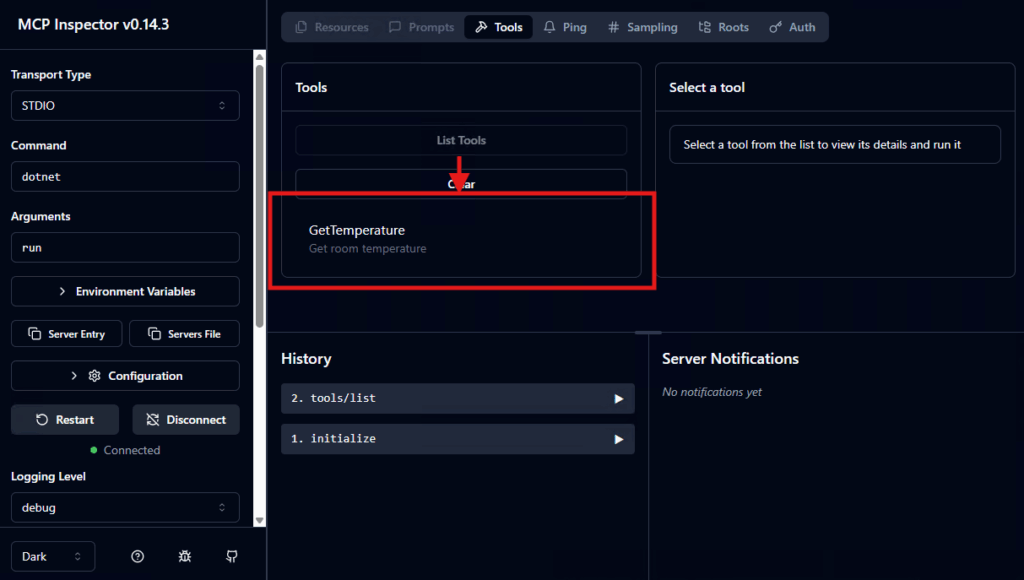
Clicking the “Tool list” button will show all methods we’ve exposed in our application. If we click on our method (called a “tool” in this context), we can test it in the right section.
Conclusions
This article was an introduction to MCP servers’ potential, which allow us to extend our AI services’ functionalities with elements from our reality (personal or business). My need was to integrate Claude with my home automation, but in an enterprise context, I see tremendous potential, especially where enterprise AI is available (e.g., Copilot).
The project we’ve seen in this article enables creating a local .NET 9 project to connect to Claude Desktop. The next step is making it public (on a corporate intranet or externally), always keeping in mind that security is fundamental: if we overlook this aspect and expose functionalities from our environment, disaster will be around the corner, especially in a historical context like this where cyberattacks are increasingly common.
I hope I’ve excited you at least a little bit! I won’t hide that more articles on this topic will follow!
See you soon!