


In modern architectures, especially those based on microservices, the API Gateway represents a fundamental component for effectively managing communication between clients and services. With this article, I aim to achieve two objectives: first, to clarify the advantages of an API gateway (and when you don’t need to use one), and second, to configure a sample project.
What is an API Gateway?
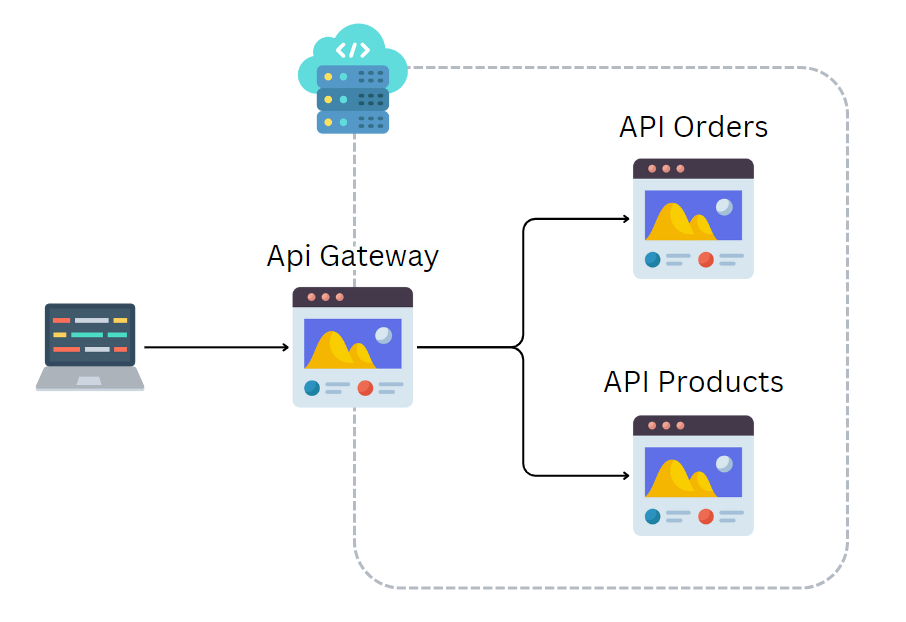
An API Gateway acts as a unified entry point for all client requests in a microservice architecture. Imagine a doorman in a large building who knows exactly where to direct each visitor: the API Gateway plays a similar role for API requests, with some additional benefits.
I should also add that an architecturally complex project might have multiple API gateway projects. Let’s say you have a common backend and different frontends for desktop, tablet, and mobile apps: it would be appropriate to create an API Gateway for each of these frontends (the Backend for Frontend or BFF approach).
Why do we need an API Gateway?
The use of an API Gateway becomes crucial for several reasons:
Centralized Routing Management: Imagine having a microservice called “OrderService” with multiple instances. Each instance has a different IP address and port. What should all the other services that need to call this service do? They would need to know exactly where all OrderService instances are located. By leveraging an API gateway, we centralize this responsibility in a single point (we could also discuss service discovery here, but we’ll address that in a dedicated article).
Monitoring and Security: The API Gateway doesn’t just handle routing calls but can manage, always from a single point, several other aspects such as:
- Authentication and authorization
- Centralized logging
- Performance monitoring
- Rate limiting (for example, against DDoS attacks)
Additionally, the content and architecture of the system (monolithic or microservices) is hidden, and the only point to access endpoints is through the API gateway.
Caching and Aggregation: In a microservice context, it’s often useful to manage endpoints that aggregate and transform data retrieved from different data sources (e.g., an endpoint that aggregates responses from three other microservices). Another advantage is that responses can be cached, forwarding calls to services only when necessary.
Load Balancing: With an advanced API gateway (like Ocelot, which we’ll see later in this article), it’s possible to distribute the call load among multiple instances of a service. This, applied to a service discovery mechanism, becomes a fundamental aspect for making a distributed application performant as it avoids creating bottlenecks.
Circuit Breaking: Implements resilience patterns to manage downstream service failures.
API Gateway with Ocelot
Ocelot is a comprehensive, maintained, free, open-source library that allows us to create our API gateway (you can find the GitHub repository here and the documentation here).
By default, the library allows you to do many things and exposes interfaces to extend certain functionalities (e.g., the IOcelotCache interface to create a custom cache management service).
Ocelot doesn’t have a GUI for management (although you can add Swagger to view configured endpoints), but every configuration is managed within one or more .json files, where we’ll define routes and various configurations.
Time to Get Our Hands Dirty 😈
Let’s see step by step how to create a solution composed of 3 projects:
- Ocelot.ApiGateway
- Gateway Ocelot
- ASP .Net Core Web Api project
- https://localhost:7500
- Ocelot.ProductService
- First microservice
- ASP .Net Core Web Api project
- https://localhost:7501
- Ocelot.OrderService
- Second microservice
- ASP .Net Core Web Api project
- https://localhost:7502
Let’s open Visual Studio, create a new solution, and create the 3 projects.
Configuring ProductService
Within the first service, let’s add a new Controller called “ProductsController.cs” (by default, you’ll already have the WeatherForecastController; you can delete it if you want).
Let’s create a simple controller for products:
using Microsoft.AspNetCore.Mvc;

namespace ProductService.Controllers;

[ApiController]
[Route("api/v1/[controller]")]
public class ProductsController : ControllerBase

{
    private static readonly string[] Products = new[]
    {
        "Laptop", "Smartphone", "Tablet", "Smartwatch"
    };

    [HttpGet]
    public IActionResult Get()
    {
        return Ok(Products);
    }

}
Configuring OrderService
Let’s move on to the second service. Let’s create a new controller called “OrdersController“:
using Microsoft.AspNetCore.Mvc;
namespace OrderService.Controllers;

[ApiController]
[Route("api/v1/[controller]")]
public class OrdersController : ControllerBase
{
    private static readonly string[] Orders = new[]
    {
        "Order-001", "Order-002", "Order-003"
    };

    [HttpGet]
    public IActionResult Get()
    {
        return Ok(Orders);
    }
}
Configuring the API Gateway with Ocelot
We’ve configured the two services representing two microservices; now let’s focus on configuring Ocelot. To start, let’s install this package in the Ocelot.ApiGateway:
dotnet add package OcelotNow, let’s move to the Program.cs file and add the highlighted lines
using Ocelot.DependencyInjection;
using Ocelot.Middleware;

var builder = WebApplication.CreateBuilder(args);

//Middleware Ocelot
builder.Services.AddOcelot(builder.Configuration);
builder.Configuration.AddJsonFile("ocelot.json");

var app = builder.Build();

// Configure the HTTP request pipeline.
if (app.Environment.IsDevelopment())
{
    app.MapOpenApi();
}

app.UseHttpsRedirection();

await app.UseOcelot();

app.Run();
You’ve probably noticed that we added an “ocelot.json” file. Let’s add it to the solution at the same level as the appsettings.json files.
This is the file we’ll use to define routes to various microservices. The basic file looks like this:
{
    "Routes": [ ],
    "GlobalConfiguration": {
        "BaseUrl": "https://localhost:7500"
    }
}GlobalConfiguration: defines global characteristics; in this case, we’ve defined the base endpoint for the Ocelot.ApiGateway project.
Routes: is the main configuration element, defining the list of routes. Each route has this structure:
{
  "UpstreamHttpMethod": [ "Put", "Delete" ],
  "UpstreamPathTemplate": "/posts/{postId}",

  "DownstreamPathTemplate": "/api/posts/{postId}",
  "DownstreamScheme": "https",
  "DownstreamHostAndPorts": [
    { "Host": "localhost", "Port": 80 }
  ]
}
Elements starting with DownStream define where the API call will be routed (in our case, we’ll define the endpoints of the services we created earlier).
Elements starting with UpStream instead define the endpoint that Ocelot will expose.
By completing this last part and adding it to the general “ocelot.json” file, here’s our result:
{
    "Routes": [
        {
            "UpstreamPathTemplate": "/api/catalogs/products",
            "UpstreamHttpMethod": [ "Get" ],

            "DownstreamPathTemplate": "/api/v1/products",
            "DownstreamScheme": "https",
            "DownstreamHostAndPorts": [
              { "Host": "localhost", "Port": 7502 }
            ],

        },
    ],
    "GlobalConfiguration": {
        "BaseUrl": "https://localhost:7500"
    }
}
Configuring Service Ports
Let’s modify the ports in the Properties/launchSettings.json files of each project, configuring the endpoints as follows:
ApiGateway: port 7500
ProductService: port 7501
OrderService: port 7502
Let’s launch the project and test our API Gateway (if you want, you can configure the .http files that are already included in the project; here’s my guide on how to do it). By calling the endpoints on port 7500, the calls will be routed to the two services, available on ports 7501 and 7502.
Conclusion
Implementing an API Gateway with Ocelot in .NET Core offers numerous advantages:
1. Implementation Simplicity: Ocelot provides a clear interface and JSON-based configuration that makes it easy to start.
2. Flexibility: The ability to configure routing, authentication, and other aspects in a declarative way makes it easy to adapt the gateway to specific needs.
3. Scalability: The architecture allows adding new services without modifying existing clients. In more complex scenarios, the concept of service discovery also comes into play, considering that services can vary in number over time and don’t always have a fixed address. Ocelot supports all this, but it wasn’t covered in this article for simplicity’s sake.
4. Maintainability: Centralizing routing logic and security policies simplifies infrastructure management.
However, it’s important to consider that introducing an API Gateway adds a new layer of complexity to the architecture and could introduce a single point of failure if not properly designed. It’s essential to carefully evaluate your system’s requirements and implement appropriate resilience and scalability strategies.